Monday 29 January 2018

Casing the Catty Card 3

Here is the 3rd card I made using the Epic Celebration Sale-a-Bration stamp set.  Just one of a few items free with each $90 spent on Stampin Up Products.  I used the image layout on pg 63 of the main Catalogue for my inspiration.  Full list of items used are at the end of the post with a link to my online store should you wish to purchase any.


I cut a piece of Dapper Denium Card 10 x 14.3 cm and sponged around the edge and adhered to the base card also of Dapper Denim.   I then stamped the Plimsol image on a scrap of white card in Dapper Denim ink using watered down Dapper Denim ink and a dry aqua marker.  I then fussy cut around the image.  I stamped the senitment twice, once on Pool Party and Once on Lemon Lime Twist and cut these out by hand.  I mounted the runners and the Lemon Lime image with dimentionals used double sided tape for the Pool Party words.  I adhered these to a piece of Whisper White 8.5 x 6.5cm and then attached a piece of lemon lime twist 6 x 8.5 cm angled behind.  This was then adhered to the base card, super easy and super quick.  You could just stamp the runners directly onto the white card if you didn't want to fussy cut the image.

Thanks for looking
Jo


Product List
Blender Pens
[102845]
$21.00

Sunday 28 January 2018

Bottles and Bubbles

Today's card I made for a workshop I did today.  I was inspired by my blog hop card and an image I saw on Pintrest for the bottle, BUT I forgot to pin it and now I can't find it.  I hate it when I do that but still I keep forgetting.  Click on the follow me button to see all my blog entries, you can also like my Craft page on facebook a link which is HERE.Just click on LIKE to see all my updates.


Firstly I embossed the bubbles and rings with clear embossing powder in opposite corners.and then layered the Early Espresso piece centrally.  I also embossed the sentiment in white embossing powder onto red card stock and cut out with the smallest shape and the slightly large one in white.  After I adhered the red to the white I trimmed away the white on the side.

I cut out the smallest bottle in vellum and sponged/daubed espresso ink on to the image up the neck leaving a section at the top.  If you want a clean edge to the top of the contents of the bottle, just put a piece of card or paper down and sponge over.  I then used Bermuda bay ink which I daubed the top of the bottle to give that greeny blue glass colour.   Then using my chalk pen I drew a line down the side of the bottle and around the base a fraction to imitate the light shining on the bottle.  I rubbed my finger over it to soften it a bit. 

I cut the straw out of whisper white cardstock and drew stripes down it with my red marker.  Next time I would do them diagonally.  To adhere the straw to the card I put some tape down the back of the bottle and stuck the straw to the back of the bottle, it's easier than putting adhesive on the straw.  I then adhered the bottle to the Oval.

I punched out the bermuda bay strip with the triple banner punch and adhered it centrally behind the oval piece.  I then popped some dimentionals on the back and popped it onto the Card.

I love how the vellum allows the straw to show through making it look more authentic as a bottle.

Thanks for looking.
Jo


Product List
Heat Tool
[129056]
$50.00
Real Red Stampin' Write Marker
[100052]
$6.00

Casing the Catty card 2

As Promised this was the second card I made using the Epic celebration Stamp set.  Which I cased from Page 43 of the Main catalogue. A full list of products are at the end of the post.

Firstly I embossed a piece of Pool Party with the Seaside Embossing folder which I adhered to the Base card of Dapper Denim centrally.  I then used my white gel pen to do a faux stitched effect around the outside edge.  I cut a piece of lemon lime twist and stamped the headphone stamp all over randomly.  I then cut a V by hand.  I cut the largest stitched circle framelit out of white card and used the Punch to cut out the badge shape in the middle.  I used  a post it to mask the Awesome on the stamp and stamped You're at the top.  I then did the same for the awesome embossing it with white embossing powder before cutting the word out with a framelit.  I tied some twine around the Large banner and adhered on an angel I then adhered the circle over the top andI used dimentionals on the Awesome placing it over the top.

Thanks for looking
Jo


Product List
Blender Pens
[102845]
$21.00

Saturday 27 January 2018

Inksomniacs Team Blog Hop


Welcome to our Insomniac Team Blog Hop.  This is my first time partaking in a blog hop and I am super excited.  Our challenge was to CASE the Catty, this included the Main Catalogue, The Occasions Catalogue and the Sale-A-Bration flyer.  I got very carried away and actually did 3 different CASEs of 3 different cards using only 1 stamp set and the same combination of colours and I am actaully really happy with how they turned out.  If you like today's card, I will be posting the others later this weekend so be sure to follow me if you don't want to miss them by clicking the follow me link.  I also have a facebook page which you can find HERE.  I am hoping to add a fourth to make a complete set and will post a pic of them all together.  A full list of items with their codes are at the end of this blog.  The set I have used is one of our sale-a-bration Items which you can get for free with a $90 order, there are some other great items to choose from too.

For today's card I used the picture on page 28 of the Occasions Catalogue 2018 


And below is my take on it, I used the layout as my inspiration.


You will need to cut out the following pieces

Dapper Denim Card  
14.8 x 21 cm folded in half to make the base and a piece..
10 x 14.3 cm

Lemon Lime Twist 
7 x 9.5 cm Approx

Pool Party 
2.5 x 12 cm

Very Vanilla
9 x 6.5 cm

Scrap of crumb cake

Cut out the the oval using the 3rd largest Stitched Oval Framelit and the vanilla card stock.
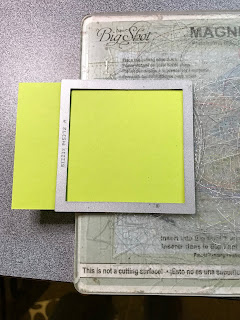
Using the largest Square Framelit you cut around the edge of the Lemon Lime Twist Card, hence the Approx size.  For instructions on how to do this to make an oblong shape please see the end of the blog post where I will post some photos.  

Using the triple punch cut both ends of the Pool Party Card.

Now we have all of our pieces ready we are ready for the creating.

Take the large piece of Dapper Denim Card and stamp diagonally from bottom left to top right in a random pattern using the 'Here's to an Epic Celebration" and the spotty stamp with the Dapper Denim Ink.  Daub around the whole piece also in the same colour.

Stamp the Guitar image centrally onto the vanilla Oval.  You can do this before cutting it out if you want to.  Squeeze the ink pad in a closed position and open up, this will leave a bit of ink on the lid, spray a little water to make it a wash and colour the guitar in gently using either a blender pen or aqua marker.  For little images I don't add water to the aqua pen opting for watering down the ink, it gives you more control of the wetness as we are using plain vanilla which does not do well if too wet.  After I had finished and the image was dry enough, I stamped the sentiment  using the Tranquil Tide Ink.

Sponge around the Lemon Lime shape with a dauber using the lemon lime ink pad.

Adhere the pool party strip to the stamped piece of card about 2/3 rds down to the right and wrap the twine around as show and tie in a bow (not stampin up).  Adhere this to the base card leaving an even edge.

using some dimentionals mount the lemon lime twist piece as shown.  Then using more dimentionals mount the Oval image.  You will notice that I opted to put it centrally on the Lemon Lime piece and not off to one side as the Cased card.  I tried, I really did but I just couldn't do it.  It's up there with not being able to put sentiments crooked.  In saying that you will see on one of the following cards I will post I DID do a crooked sentiment.  In this setting I can just about cope, but It doesn't sit well. 

I punched out a little banner with the retired banner punch and put this under the oval, you could cut by hand etc .

Below are links to the other blog hoppers, go take a look at their fabulous creations for some inspiration or click on the NEXT button which, as I am last, will take you To Linda Dalke first on the list..


Below is a how to in photos.  First place your framelit around the edge of one end of the Lemon Lime card, remove and do the same the other end, you can kinda feel the groves.  

You can either hang it off the edge of the platform or just put the top plate over the part you want cut.  First image shows hanging over the edge and the last pic shows doing it the other way.  


Product List
Banner Punch
Banner Punch
[133519]
$21.00
Blender Pens
[102845]
$21.00

Global Design Project #GDP238

I started off making one card for the challenge at ' Global design project'. I knew str...